By Eric Ramirez
In our last article Shifting Business – Rear Derailleur Discussion, I discussed setting up the rear derailleur. I hope you read it and it helped establish your already growing knowledge of derailleur adjustment. This issue I will discuss the B-Tension adjustment. I’m devoting this article entirely to the matter because B-Tension is not very easy to figure out. This is proven by the wide range of improperly adjusted B-Tension screws I come across. The most important part of this is knowing why it is there and what it does.
What is B-Tension?
B-Tension is an adjustment using that mysterious third screw on the back of your rear derailleur. Its proper adjustment is the final step to clean and quiet shifting. It also provides a degree of chain tension assuming:
- Chain is properly installed and the right length.
- Rear derailleur cage is appropriate length for your chainring, yes chainring, configuration (I.e., 1x, 2x, or 3x) – Fewer chainrings, shorter the cage can be.
- High and low limits properly adjusted .
- Cable tension is properly set.
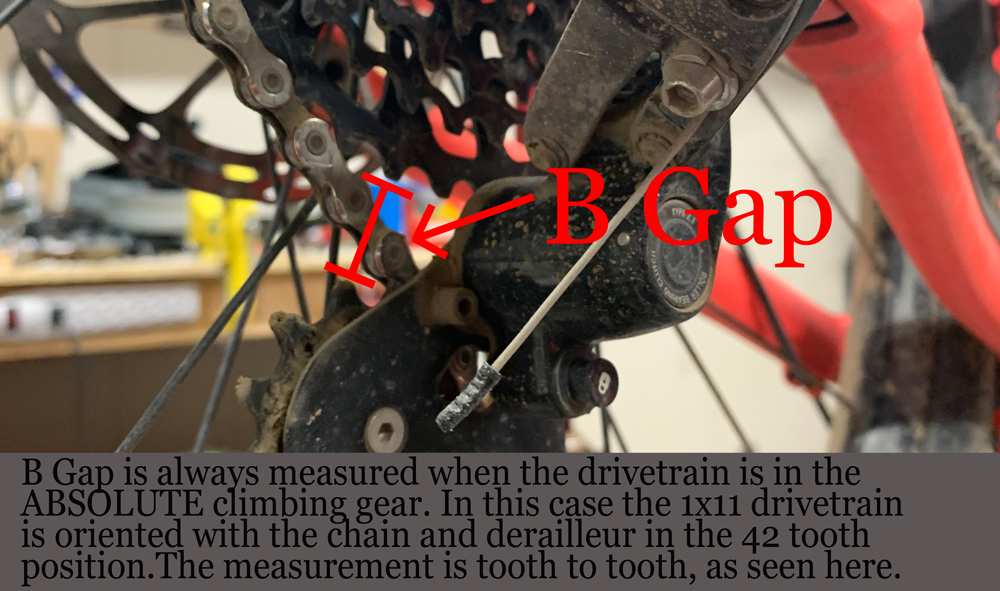
The more B-Tension the derailleur has, the further from the cogs it will naturally sit. This is generally called B-Gap. This allows the chain to have a certain amount of flection as it travels from the upper (jockey) pulley of the derailleur to the cogs. Using larger climbing cogs usually demands a larger B-Gap.
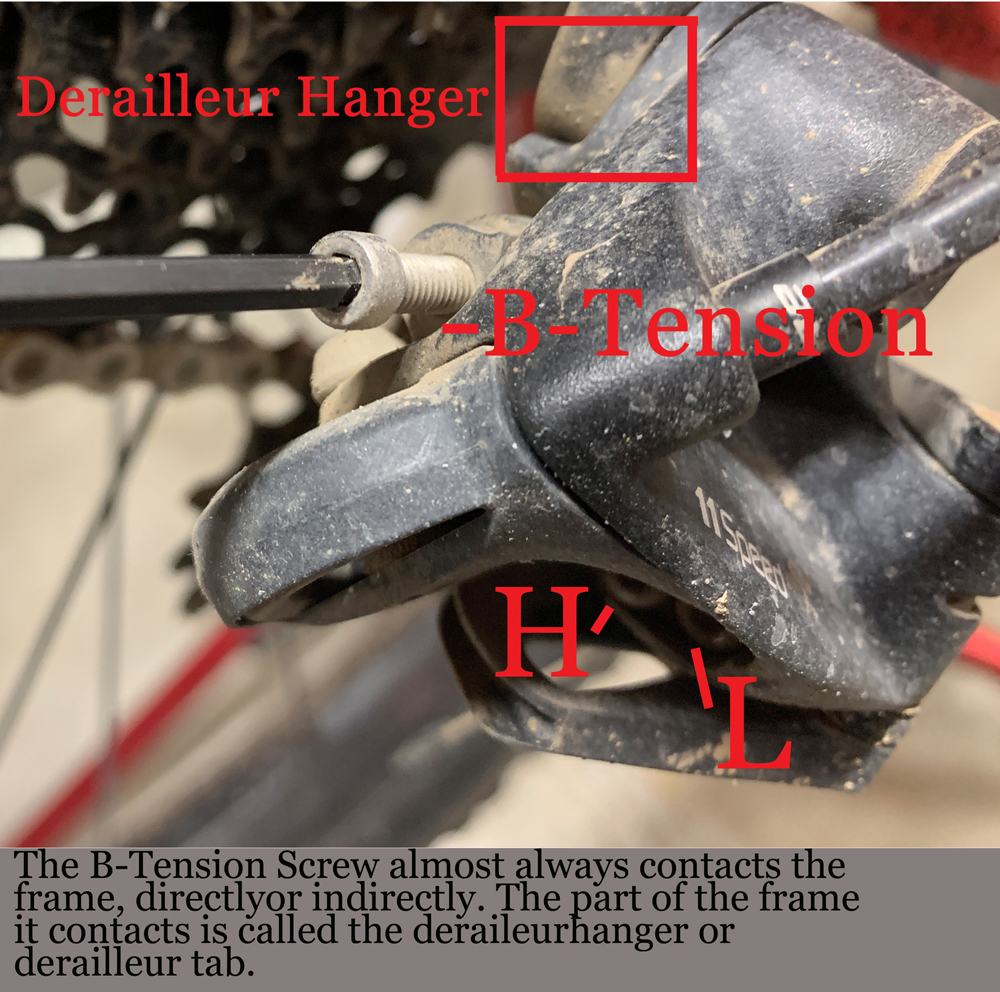
Despite the differences in the derailleur design, B-Tension always performs the same job. It transcends almost all rear derailleurs, except the most inexpensive units. It is not marked by an “L†or “Hâ€. The screw that makes the adjustment either contacts the derailleur hanger either directly or indirectly. Some units are spring loaded – allowing for dynamic chain tension – while others are static.
Locate the B Tension Screw
Almost all rear derailleurs are slightly different in regards to B-Tension location. Finding this screw could be as simple as locating the non-marked screw. Other derailleurs may take guess work. Get to know your derailleur by getting close and inspecting or searching on the internet for specifications.
Identify the Need to Adjust
If the jockey pulley sits too close to the cogs, it will struggle to shift. This is most notable when shifting into the largest cog. The chain is forced into a sharper angle moving from one cog to the next. As the chain bounces around on the edges of the teeth, it misses the shifting ramps of the cassette cogs. And it won’t shift unless it is forced.
Conversely, the gap could be too large and then shifting simply becomes unpredictable and erratic. It worsens when shifting into the smaller cogs. If there is way too much of a gap it will even struggle to get to the smallest cog. One must find the sweet spot.
Double check your “low†limit (covered in previous CW issue) to be sure that the derailleur is actually getting to the lowest cog. If it is, then the B-Tension is likely the culprit. The derailleur may have too large or too small of a B-Gap.
Adjustment
Locate your B Tension adjustment screw and find the correct tool to do the job. (Hint: Phillips head screws usually work better with JIS screwdrivers). My first move is to shift the rear derailleur to the lowest geared cog. Then, supposing there is more than one chainring, shift into the smallest chainring. If there is no B-Gap, the upper derailleur pulley will look like it is dragging on the cog as the chain passes between them. On certain configurations this will make a rumbling sounds as it is pedaled in the work stand.
If there is a gap then back off on the B screw until the derailleur’s upper pulley appears to almost touch the cog. This is your control point. It is where technicians start the B-Tension adjustment process.
From this point progressively turn the B Tension screw 1/2 turn at a time clockwise, or in. Pay close attention to the B-Gap. As the derailleur starts to pull down and away from the cogs, try shifting again. Sometimes, it requires the smallest gap.
If it offers the same result, repeat the steps by adding 1/2 turn at a time. Shift again.
Does chain change gears?
Is it a clean and quick shift?
If so, shift through the range and make sure that all gears are crisp and clean. If you have made a rather large correction to the B-Tension, you may need to adjust your low and high limits, and, possibly, cable tension.
SRAM Rear Derailleurs
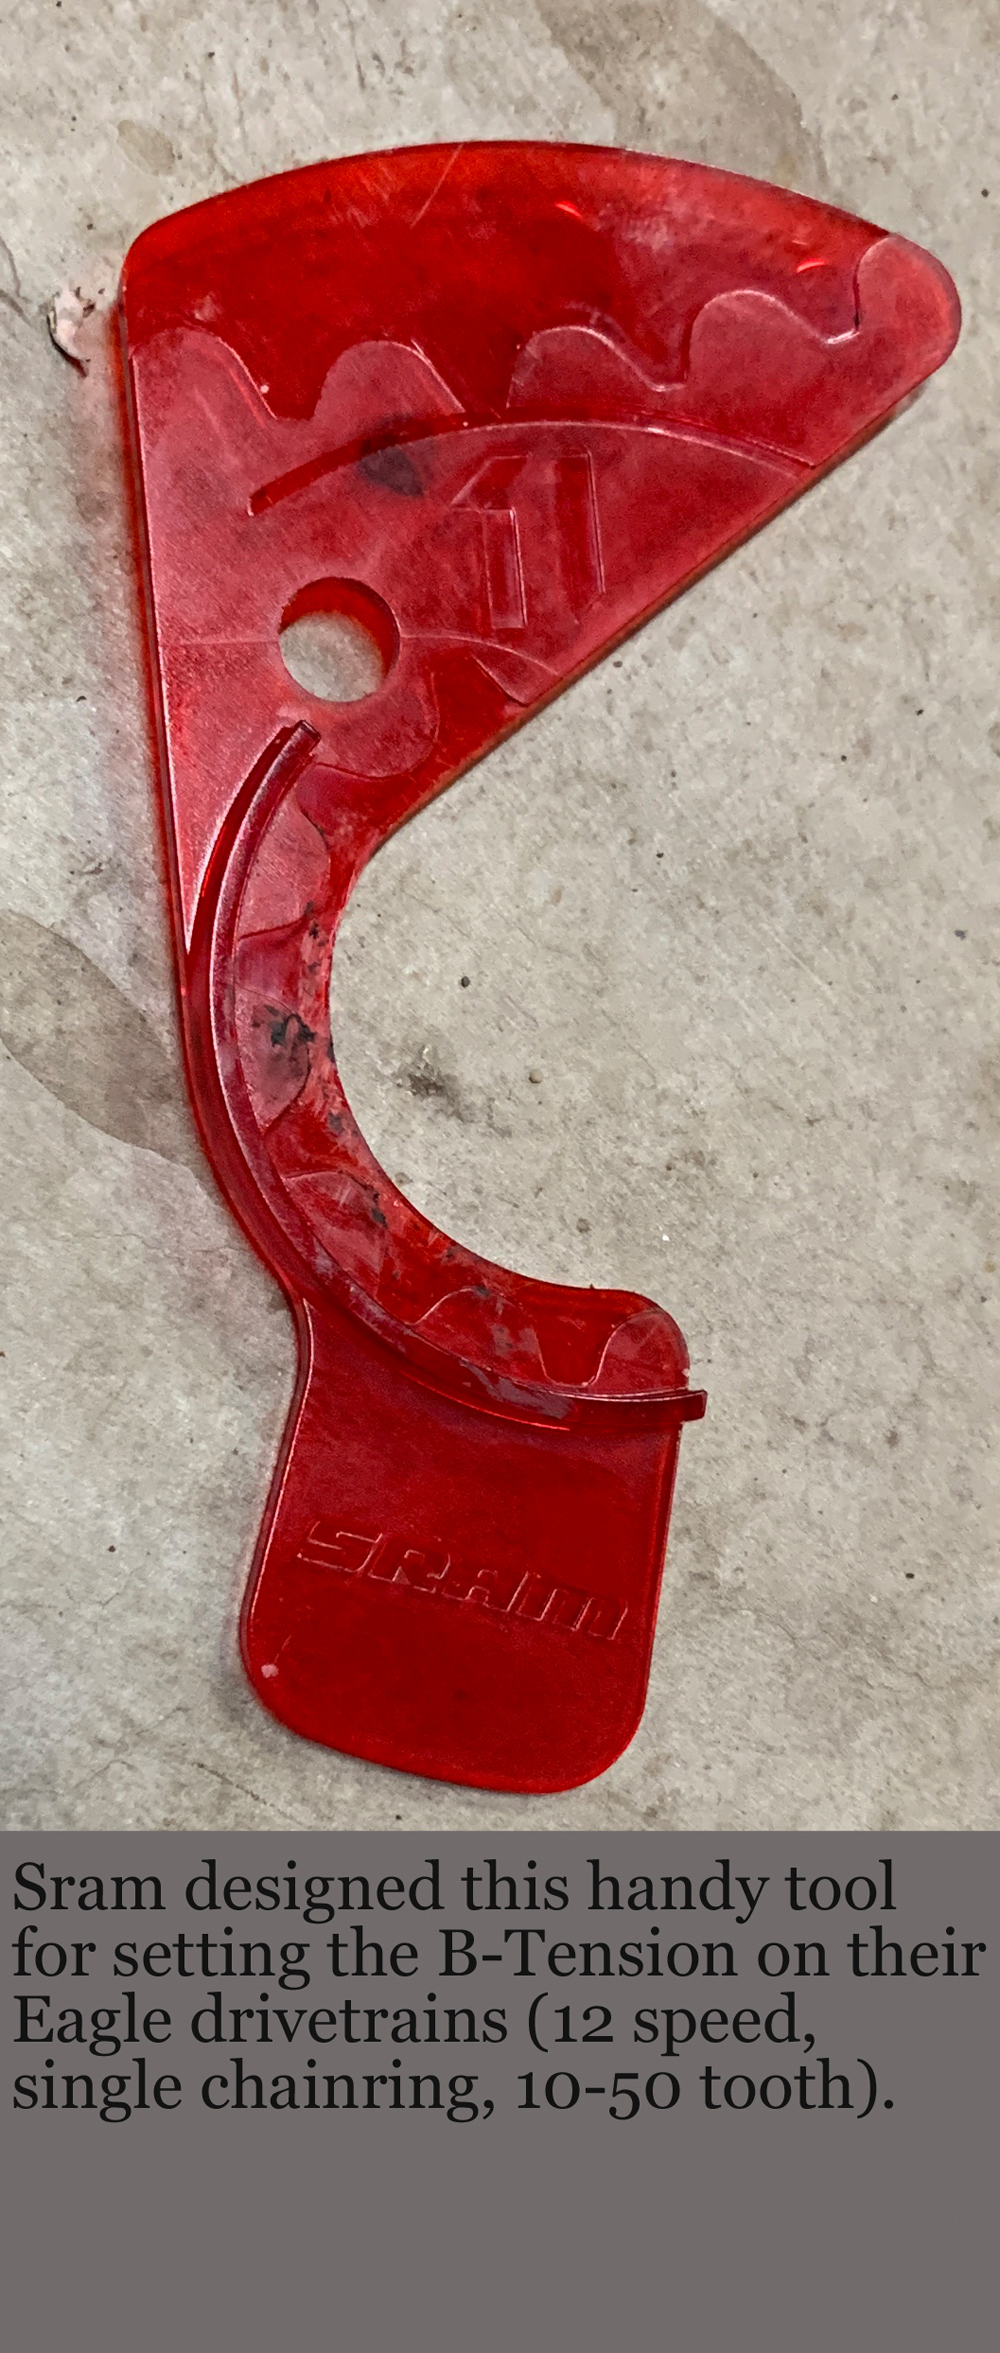
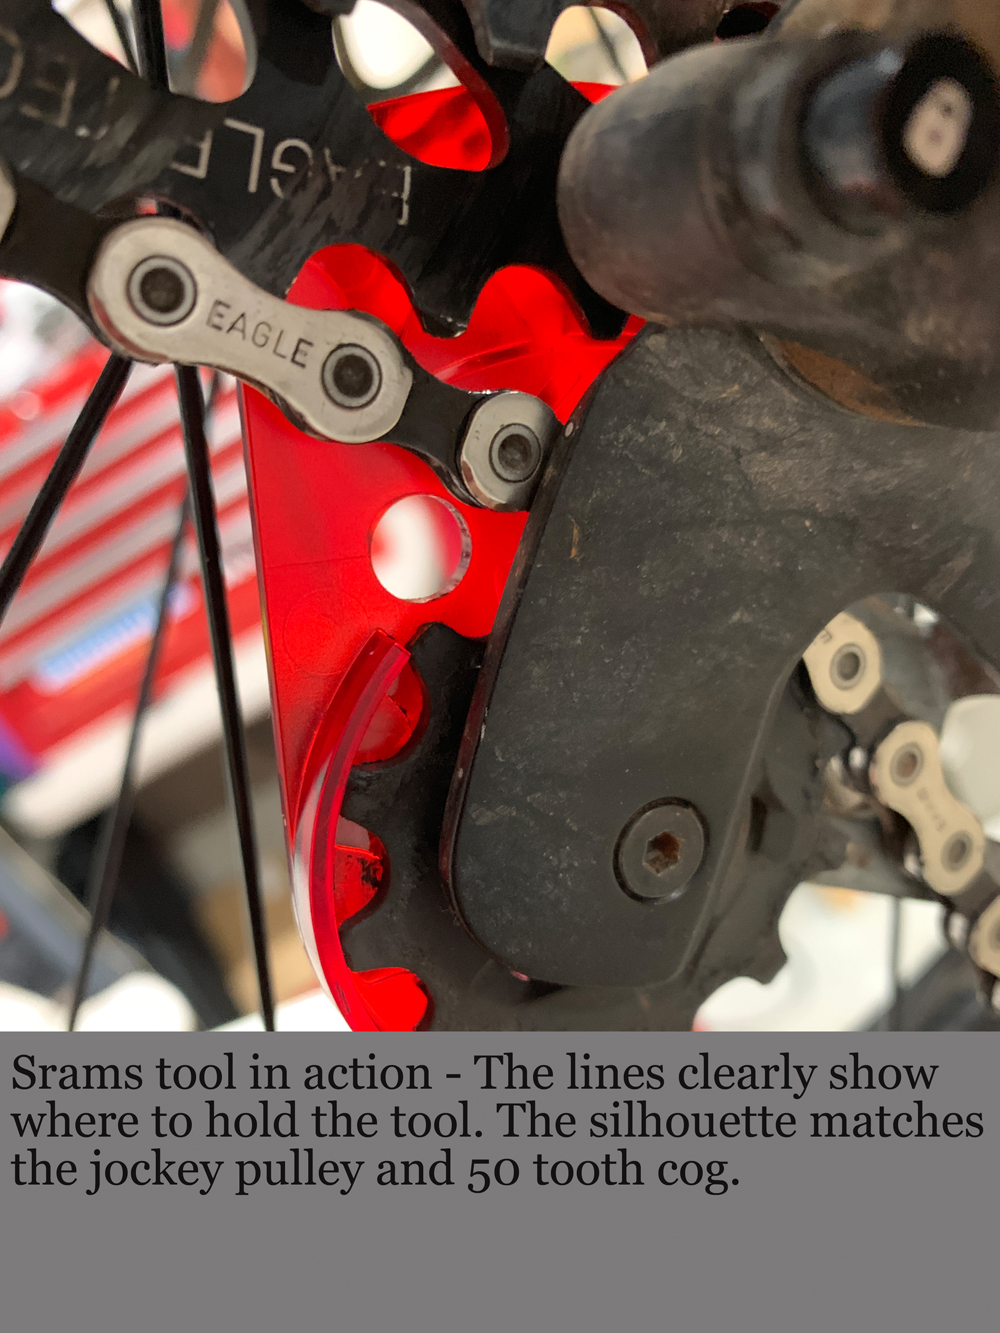
What about SRAM derailleurs? Their road rear derailleurs typically have a 6mm B-Gap. Their 1×11 drivetrains require roughly a 14mm B-Gap. Their 1×12 derailleurs come with a really neat tool. It’s translucent red and fits behind the low gear and upper pulley. Adjust the B Tension to these measurements and it is generally smooth sailing. Depending on mountain bike suspension designs and drivetrain wear, B Tension measurement may vary. Thus, this article is still relevant to SRAM derailleurs.
Be Patient – Don’t Throw Wrenches or Bikes
Working through the shifting and tensioning process can take some time, especially if this is an adjustment you have never done before. The experience of a seasoned wrench may be what you need on this one. But hopefully you have a better picture of why B-Tension is there and what it does for your ride.
Eric has 20 years experience working on bikes, starting in Park City. Today he’s a head technician at a shop and maintains a blog about wrenching and adventures at angrybikemechanic.com